Project Schedule
The Project Scheduling feature can be found as a link labeled “Project Schedule” or “Create Project Schedule” under the Projects tab of ProjectGrid.
What is the difference between the project schedule and the task list?
These are just different views of the same set of information.
Who can create a task?
Anyone who has been added to the project can create tasks (which will show up on the schedule).
Who can modify a task?
Only the person who created the task, the person assigned to work on the task, and project administrators can edit the task.
Who can delete a task?
Only the person who created the task, and project administrators (but NOT the assignee to the task) can delete the task.
What types of email are sent by the scheduling system?
Task Started or Task Completed Email: When you indicate that you started or completed a task, by filling in the actual start or actual finish date, a Task Started or Task Completed email is sent to the person who assigned you the task and also to any other assignees to the task and people who posted comments about the task.
Task Changed Email: When you change a task, everyone involved with the task (assigner, assignees, and anyone who posted comments about the task) are notified.
Removed from Task Email: When you remove someone from a task, they will no longer receive emails about the task, unless they have already posted comments on the task. However, they will receive a final email telling them that they have been removed from the task.
Task (not) Ready to Start Email: If you create a task with a predecessor task, then completion of the predecessor task triggers an email from you indicating the the person you assigned to the task can begin on the task. If the predecessor task is changed to incomplete (i.e. the assignee blanks out the actual finish date after submitting an actual finish date), then a "Not ready to start (no longer ready to start) email is sent.
If a comment is posted to the task, then you check boxes next to each person's name to notify anyone involved with the task about your comment.
Assigned to a Task Email: When you assign someone to a task, they are sent an email notifying them that they have been assigned to the task.
Why don't I receive copies of the email being sent by the scheduling system?
In order to reduce the amount of unnecessary and annoying mail sent out by the Scheduling System, mails are NOT sent to the user triggering the email, since they obviously know that they just started a task, completed a task, changed a task, or posted a comment to the task or finished the predecessor task, etc.
Creating New Schedules or Loading New Data from an MPX file
Initially, a blank schedule is created for each project and subproject. From here the schedule can either be created from scratch or an existing schedule can be imported from an MPX file. Typical schedule software that can be exported to MPX include: Primavera, Suretrak or MS Project (only earlier versions). In order to import a schedule from one of these applications the schedule must be saved in MPX format. Next, click on the “Load MPX file” link.
Who can import MPX data?
Only project administrators can import MPX data.
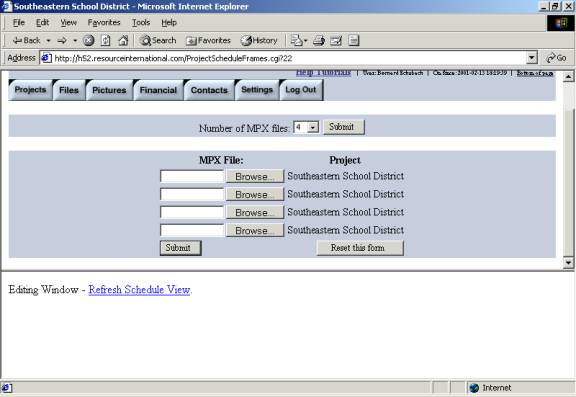
How is MPX data imported?
Click on the "Load MPX file" link at the bottom of the Schedule screen.
By default the next screen (shown below) prompts for up to 4 MPX files. If more than four files are to be needed, go to the pull down menu next to the “Number of MPX files” option and increase the number to what is desired. Then click on the “Submit” button located next to the pull down menu to update the form.
MPX files can now be imported by entering the file name either by typing it into the text box or by clicking the Browse button and searching for the file on your computer. Using the Browse button is highly recommended to eliminate any typographical errors and to ensure the paths to the targeted files are correct. Repeat this process for all MPX files that are to be imported. If there are extra import slots that are not needed, simply leave them blank. Click the Submit button below the text boxes when finished.
What will happen to the old schedule data when importing an MPX file?
Clicking submit will delete and replace only schedule data that was previously loaded from an MPX file. Schedule data entered through the web interface is not affected by loading of an MPX file.
Assigning New Resources
After importing MPX files, the following screen will be displayed if any resources need to be assigned. This process can be skipped by clicking the appropriate link near the top of the page. To assign a resource, scroll to the desired role or task and then choose the resource from the pull down menu located to its right. For example, suppose “Acme Construction” is to install some bleachers. Simply scroll down (if needed) and find “Bleacher Installers” and then choose from the pull down menu “Acme Construction.”
When all resources have been assigned, scroll down to the bottom of the page and click on Save Resource Assignments.

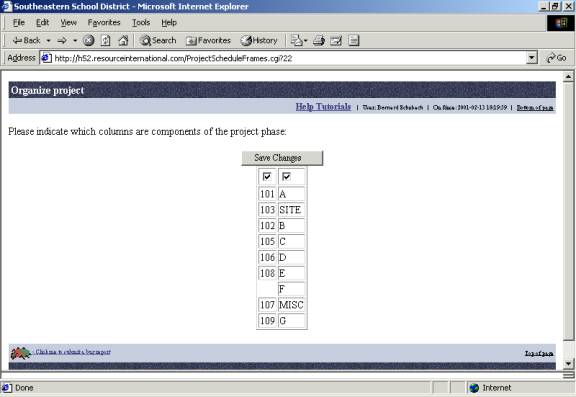
Project Phase Selector
The next screen shown will be the project phase selector. Leave a checkmark above any column that is part of the project phase, click the Save Changes button when finished.
Finally a schedule will be displayed, similar to the one shown below:
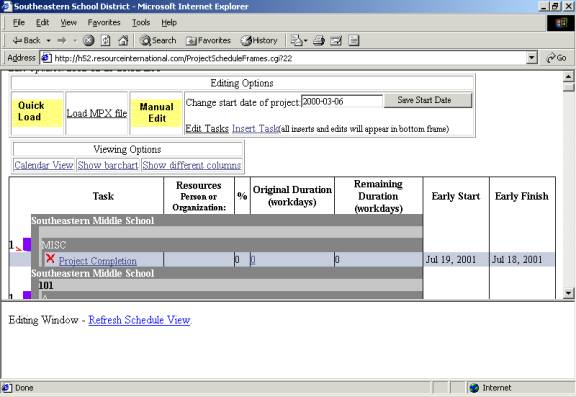
Editing Tasks
In order to edit a task, click on the task name. This will bring up the following screen
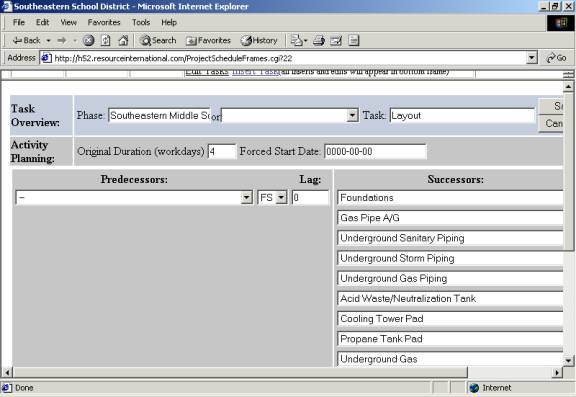
Here changes to the task can be made. Make the appropriate changes and click the Save Changes button to save all changes on this screen. (NOTE: you may need to scroll down to see all editable fields.)
Specifying Holidays
If this is the first time that you are editing the schedule or if the schedule has been expanded to a new calendar year, the next screen will say “You must specify what holidays are observed for this project before you can save changes. Please click here to proceed.” Upon clicking the corresponding link, a screen to choose the holidays for the project will be displayed. This must be done because holidays are added one year at a time, so if the schedule has gone into a new calendar year, then the holidays will have to be re-specified.
This task will then recalculate the schedule for the edited task and all of its dependent tasks.
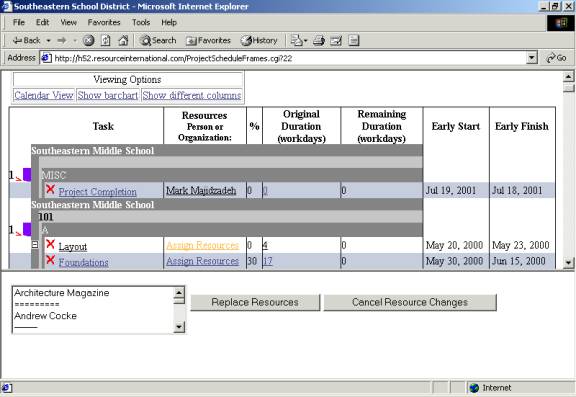
Modifying or Adding Resources
By clicking on either “Assign Resource” or the name of a Resource, the option of modifying the resource assignments for the schedule will be displayed (shown below). In order to preserve any existing resource(s) or to add multiple resources, hold down the control key to select multiple resources from the menu.
Created with HelpSmith.